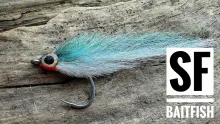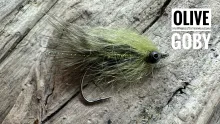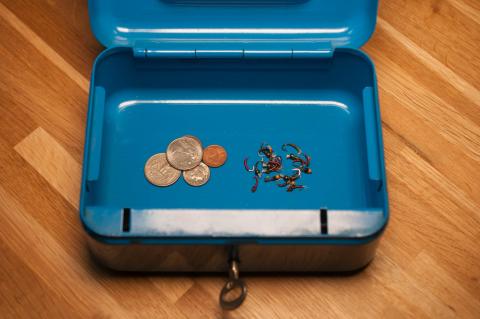
A selection of saltwater patterns from Chris Edghill

Still
| Hook | Mustad 34007 or equivelant no.4/0 to 2 |
| Thread | White mono waxed thread |
| Body | Pearl or silver Coursair tubing |
| Eyes | Prismatic stick on or equivelent |
| Adhesives | Super glue and Epoxy |
| Tail | Lite Brite |
- Cut a piece of Corsair tubing to required length.
- Flatten and stretch to a fish' shape, use the thread center line as the lateral line.
- Put a large needle in to the vice and tie on the thread at the point.
- Attach a bunch of silver Lite Brite and tie off.
- Slide the Corsair tubing tail upp to the tie in point of the tail and attach the two
- Apply some Superglue and when dry slide it off the needle.
- Thread the hook through the opening in the Coursair tubing and out through the stomach area about 1 centimeter from the head.
- Tie in the thread at the eye of the hook and tie down the tubing, building upp a tapered head.
- Whip finish and glue with Superglue.
- Apply the Prismatic Eyes and a coat of epoxy so to keep the shape of the head and to increase durarability.
- Use permenant makers for the lateral line and back colour as required.
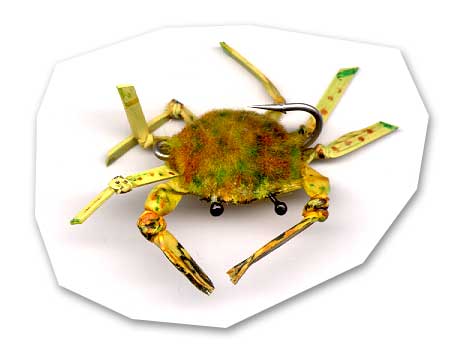
Chris' Crab
- Wrap thread on to hook at mid point.
- Creat a large ball using egg yarn so that it covers hook shank, this is then trimmed flat on the top of the hook and eliptical and domed on the bottom to create the crab shell. At this point it is important to add some super glue so that the body wont spin on the shank.
- Cut and knot rubber bands for the legs and claws.
- Add some white silicone, the type used for sealing around bathroom sinks, and position the leggs and claws in the silicone.
- Cut a piece of flat lead foil to the shape of the crab's underside and stick this over the leggs and claws as well. This will make the crab ride hook point up.
- Apply some more silicone to cover the lead foil and smooth it out to create the underside.
- Burn 80 lbs. nylon for the eyes and stick them into the egg yarn with super glue.
- Use permanant markers to colour the crab as you wish.

Toby
| Hook | Mustad 34007 or equivelant no.4/0 to 2 |
| Thread | White mono waxed thread |
| Body | Pearl or silver Corsair tubing |
| Eyes | Prismatic stick-on or equivalent |
| Adhesives | Super glue and Epoxy |
| Tail | Chick marabou |
- Cut a piece of Corsair tubing to required length.
- Flatten and stretch to a fish' shape, use the thread center line as the lateral line.
- Put a large needle in to the vice and tie on the thread at the point.
- Attach a bunch of silver Lite Brite and tie off.
- Slide the Corsair tubing tail upp to the tie in point of the tail and attach the two
- Apply some Superglue and when dry slide it off the needle.
- Thread the hook through the opening in the Coursair tubing and out through the stomach area about 1 centimeter from the head.
- Tie in the thread at the eye of the hook and tie down the tubing, building upp a tapered head.
- Whip finish and glue with Superglue.
- Apply the Prismatic Eyes and a coat of epoxy so to keep the shape of the head and to increase durarability.
- Use permenant makers for the lateral line and back colour as required.


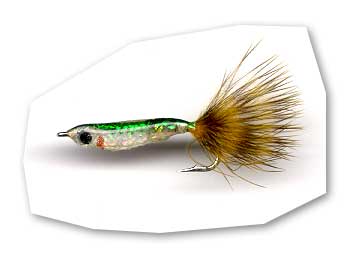
Rhody Chovy
| Hook | Mustad 34007 or equivelant no.4/0 to 8 |
| Thread | White mono waxed thread |
| body | Pearl or silver mylar tubing |
| Eyes | Prismatic stick on or equivalent |
| Wing | Fishhair, Angel Hair, Lite Brite or any synthetic fibers to match length required |
| Adhesives | Super glue and Epoxy |
- Tie mono thread onto hook shank, and leave a long tag end or rib coming off rear end of fly
- Tie in sparse amount of tail material. Tail should be no longer than the hook shank. Keep the thread back, behind the point of the hook.
- Cut a piece of Mylar tubing 2.5 times the length of hook shank.
- Slide tubing over the hook shank. Tie down and tie off thread.
- Work the hook eye through the tubing, and tie the mono thread back on, right behind the hook eye.
- Cut 10 strands of Krystal Flashes to suit bait fish colour.
- Folding it over your tying thread, tie the flash in at the head, right at the hook eye.
- Whip finish the thread and tie off.
- Pull the wing materials back tightly and smoothly and tie them down with several wraps from the tag end.
- Flip the fly over in the vise.
- Pull the remaining Mylar tubing under the hook shank, so that it forms a nice little swag belly.
- Secure the tubing with a few wraps from the tag end and whip finish the tag end.
- With scissors, trim all extraneous tubing, as close to whip finish point as possible.
- Place prismatic stick on eyes close to hook eye.
- Paint on gill.
- Cover entire fly body with the epoxy. Bring epoxy a little past end of fly body to prevent tail materials from fouling. Watch out for the formation of a bubble right around the fly's eye.

Lipstick Fly
This fly may not be the most beautiful in your box
This fly may not be the most beautiful in your box and may seem to be stale but take a closer look at the small fry that swim around the coast and you will see that they swim with a jerky side to side action. With a short sharp retrieve of about 3 or 4 inches the fly will come alive and is a killer.
| Hook | Mustad 34077 or equivalant long shank hook no.4/0 to 2 |
| Thread | White mono waxed thread |
| Body | Holagraphic tinsell covered by plastic tubing |
| Wing | Krystal Flash to suit bait fish colour |
| Eyes | Prismatic stick on or equivalent |
- Tie on the thread at the head and lay down a neat layer back to just above hook point.
- Tie in and make a body of holagraphic tinsel.
- Cut a bunch (20 strands) of Krystal Flash, fold in half and tie in at head so that they extend past bend by about 1 inch
- Tie off and glue with super glue.
- Cut a piece of clear plastic tubing to match body length, from eye of hook back to where bend begins.
- Thread on to hook from the head.
- Mix and apply some 5 minutes epoxy to the area just behind hook eye
- Bring the tubing foward to sit just behind the hook eye
- Apply stick on eyes and a little more epoxy so that you just cover them
- Allow to dry.
- With the help of a glue gun and clear glue apply a blob to the Krystal Flash, try to spread out the fibers
- in the glue and flatten with wet fingers
- When hard cut out a fish tail shape.
Mylar Minnow
I have caught all sorts of fish on this one, from jacks, rainbow runners and garfish in the saltto grayling, perch and trout in the fresh
If any weight is required I use lead wire and push it into the piping on the side of the hook I wish to sinkie. point upp or down before I apply the epoxy.
Epoxy is one of the worlds most alargy causing chemicals, so dont get it on you. If so you should clean it off A.S.A.P. with aceton.
If you need to take a leak in the middle of a gluing seccion, bite your lip!
| Hook | Mustad 34077 or equivelant long shank hook no.4/0 to 2 |
| Thread | White mono waxed thread |
| Body | Pearl mylar tubing |
| Tail | Chick marabu with a few strands of pearl Flashabu |
| Eyes | Prismatic stick-on or equivalent |
| Adhesives | Super glue and Epoxy |
- Tie on the thread at a point just above the hook point.
- Tie in a tufft of chick marabu combined with a few strands of pearl flashabu.
- Remove the core and thread over the hook eye a piece of braided pearl mylar tube
- Tie it off and glue with super glue just above hook point.
- Use your fingers to stretch the mylar tuing to a fish shape and tie off at the head
- Clip away any excess material and creat a thread head.
- Whip finish and glue
- Apply Prismatic Eyes and any markings with permanant markers required.
- Mix and apply some 5 minutes epoxy to the piping
- Allow to dry.
- Log in to post comments